Understanding a simple Flutter app
Understanding a simple Flutter app

In this tutorial we are going to do a step-by-step guide in how to create a simple Flutter application, using Linux as operating system.
As stated by Google, Flutter is an open source framework by Google for building beautiful, natively compiled, multi-platform applications from a single codebase. Flutter code compiles to ARM or Intel machine code as well as JavaScript, for fast performance on any device. Flutter is powered by Dart, a language optimized for fast apps on any platform.
Here we will not go into details about the Dart language, since its concepts and syntax are easily understood by those who are used to using modern programming languages, and because our focus is on creating the application.
This tutorial is the first of a series aimed at teaching the main concepts underlying the flutter Framework through simple examples. In each lesson we will present a complete and working example. For this, functional examples will be shown, however, displaying simple screens so that the code is easy to understand, since our focus is on understanding the concepts.
In this post we will cover the concepts of widgets, stateless widgets and stateful widgets. To understand these concepts, we will use a standard application that is presented on the Flutters page: the click counter. The application screen is shown below.
In subsequent posts we will evolve into a more complex application, which will encompass API calls and monetization.

The click counter screen.
The first step is to install Flutter. Follow the instructions in the link below to install according to your operating system.
Once you have installed Flutter, run the flutter doctor command in a terminal to verify that the installation is complete against all dependencies.
$ flutter doctor

Typical messages from a flutter doctor command.
One dependency that is often missing is the android sdk. Since one of the target environments is android environment, it is important that you perform the installation. Visit the Android Studio and SDK tools website, to Download Android Studio SDK. Start Android Studio, and go through the Android Studio Setup Wizard. This installs the latest Android SDK, Android SDK Command-line Tools, and Android SDK Build-Tools, which are required by Flutter when developing for Android.
2. Set up a development environment
You can develop with flutter using a simple text editor and running the developed apps via the command line. However, it is more productive to use a complete development environment such as Android Studio or Visual code. Go to to the link below to learn how to set up an environment.
Now let’s show you how to create and run our first flutter application via the command line.
3. First app
In the directory of your choice type flutter create, followed by the name you chose for your application. In the case of our example, it is firstapp.
$ flutter create firstapp
This command will create a directory containing the entire structure of a flutter project, including a main.dart file, under the lib sub-directory that contains the application code in the dart language.

Structure of the created project.
After creating the application, you can run it by going to the application directory and executing the command flutter run.
$ cd firstapp
$ flutter run
If you have a smartphone connected to your computer, the application will run on the device. Otherwise, the framework will present execution options, as shown on the screen.

In this application, every time the button in the lower right corner is pressed, the value of the displayed number is incremented by one. It is an interesting first application because it exhibits an interaction, which distinguishes it from the first classic applications like, Hello World. Let’s now examine the code to understand how it works.
In this first snippet of code, from the main.dart file, we can see the starting point of execution, which is the main function.

The main function invokes the run App function, passing as a parameter an instance of a class that actually describes the interface that will be displayed. In the case of our example, it is an instance of the MyApp class. The body of the main function is implemented using arrow notation, which is a leaner notation for defining functions that have a simple body.

The class that describes the interface is a subclass of a Widget. A Widget is a component of an interface that enables a user to perform a function or access a service. In the case of flutter there are two types of widgets: the Stateless Widget and the stateful Widget.
The stateless widget is a component that doesn’t have a mutable state and therefore doesn’t need to monitor a state change that could affect its rendering.
On the other hand, a Stateful Widget is a component that has an internal state, and changes in the state need to be monitored, as they affect its appearance and the way it interacts.
Flutter provides a library of basic widgets that can be combined, forming a tree of components that describe a complex interface. Widgets that house other widgets are called containers.

Going back to the code, We can see that the Widget has a key parameter that can be found on basically every widget constructor. Keys preserve state when widgets move around in your widget tree. In practice, this means they can be useful to preserve the user’s scroll location or keep state when modifying a collection. Since the variable can have a null value, it is declared with a question mark.

A subclass of the widget class must implement a build method that defines how the widget is to be rendered, and returns the widget subtree that was created from this location onwards.
This method takes an instance of a build context object as an argument. This instance contains information about the widget’s position in the tree at runtime. That is, its parent and children. Therefore, each build context has different information for each widget.
The method returns a Material App widget. It is called material app because it uses Material Design, which is a design language developed by Google in 2014, and today it is one of the biggest trends in design. Material App is a convenience widget that wraps a number of widgets that are commonly required for material design applications. In this example, we are defining the application’s title, its theme which is the color blue, and a child widget through the home property, which will be the first screen to be shown in the application. In our example it’s a stateful widget called myHomePage, but it could be any name you want.
Another interesting feature of Flutter is the fact that it allows code changes to be displayed without having to restart the application. This feature is called hot reload, and it is a feature that greatly speeds up the development process.
Let’s see how this works.
change the primarySwatch property to Colors.green, and then invoke “hot reload” pressing “r” in the console where you typed flutter run, or simply save your changes to “hot reload” in a Flutter IDE . Notice that the counter didn’t reset back to zero; the application is not restarted.
Let’s now examine the code for the class My home page.

The class MyHomePage is a subclass of StatefulWidget, meaning that it has a State object that contains fields that affect how it looks. This class is the configuration for the state. It holds the values, in this case the title, provided by the parent, and used by the build method of the State. Fields in a Widget subclass are always marked as final.
In fact, who takes care of the state and rendering is the state object that must be created by overriding the create state method. Let’s then examine the implementation of this object’s class.

Dart uses a leading underscore in an identifier to mark members and top-level declarations as private. As this class will only be used in the Widget scope, so it makes sense to mark it as private. In this class, the variables that store the widget’s state information are declared. In the case of this example, we have the _counter variable that is also declared as private. It stores the number of times the screen button was pressed.
When the variable has its value changed, the framework must be informed in order to re-render the widget to reflect the change. This is done by calling the setState method. Calling setState notifies the framework that the internal state of this object has changed in a way that might impact the user interface in this sub-tree, which causes the framework to schedule a build for this State object.
In this example, the method is called within the _incrementCounter private method, and within the setState method, the _counter variable is incremented by one. If we changed _counter without calling setState, then the build method would not be called again, and so nothing would appear to happen. This style of UI programming is called declarative UI frameworks, as opposed to the imperative style of UI programming.
In the imperative style, the programmer is responsible for defining the control of the interface, collecting user interactions and changes to the model and providing the appropriate changes to the interface.
In the declarative style, the programmer only needs to inform that the state has changed, and the framework is responsible for making changes to the interface, to reflect those changes, and only to the affected elements.
This considerably alleviates the programmer’s workload and lessens the chance of errors. In the declarative style, view configurations, such as Flutter’s Widgets, are immutable, and are only lightweight “blueprints”. To change the UI, a widget triggers a rebuild on itself, and constructs a new Widget sub-tree.

As already mentioned, a widget needs to provide a build method that defines how the sub-tree is to be built. In the case of our example, the method returns a scaffold widget. The Scaffold widget implements the basic Material Design visual layout structure, and allows you to define other Material Design widgets within it. The Scaffold widget is often enough to create a general purpose mobile app, and it contains almost everything you need to create a functional and responsive app.
This widget is able to occupy the whole device screen, and it is mainly responsible for creating a base to the app screen on which the child widgets hold on and render on the screen. It provides many widgets or APIs for showing Drawer, Snack Bar, Bottom Navigation Bar, App Bar, Floating Action Button, and many more.
In this example we will only define the appbar and the body of the app.
In the appbar we display the application title.

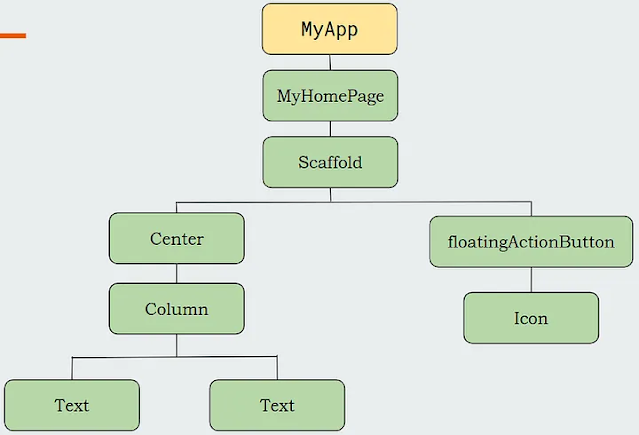
In the body are placed two widgets, a center widget container that centralizes its child widgets, and a floatingActionButton widget that can be clicked by the user. They are stacked on top of each other. In the widget center, another container is inserted, which is a Column widget.
In the Column widget, two Text widgets are inserted. One of the Text widgets will be used to display the number of clicks on the button. Note the dollar sign used in the string literal. It is used when you want to get the value of an expression used inside a string literal.
In this case, we want to display the value contained in the _counter variable. Also note the use of the context variable to obtain the style that should be used in the text, according to the application’s theme.

The other widget inserted into the body of the scaffold is a floatingActionButton. When pressed, it invokes the _incrementCounter method, which in turn invokes the setState method, causing the widget to re-render. ThefloatingActionButton has a child widget which is a plus sign Icon.
The complete tree of widgets for this simple application is as follows.
Application dependencies are declared in a file called pubspec.yaml. The file is written in the YAML language, also known as YAML Ain’t Markup Language. YAML is a human-friendly data serialization language for all programming languages. Here we can see the required fields for this application.

pubspec.yaml
Depending on the target environment, there will be configuration files for each environment. Here we can see the configuration file for Android environment.

AndroidManifest.xml
The complete code is shown below.
import 'package:flutter/material.dart';

void main() =>  runApp(const MyApp());

class MyApp extends StatelessWidget {
  const MyApp({Key? key}) : super(key: key);

  @override
  Widget build(BuildContext context) {
    return MaterialApp(
      title: 'Flutter Demo',
      theme: ThemeData(
        primarySwatch: Colors.blue,
      ),
      home: const MyHomePage(title: 'Flutter Demo Home Page'),
    );
  }
}

class MyHomePage extends StatefulWidget {
  const MyHomePage({Key? key, required this.title}) : super(key: key);

  final String title;

  @override
  State<MyHomePage> createState() => _MyHomePageState();
}

class _MyHomePageState extends State<MyHomePage> {
  int _counter = 0;

  void _incrementCounter() {
    setState(() {
      _counter++;
    });
  }

  @override
  Widget build(BuildContext context) {
    return Scaffold(
      appBar: AppBar(
          title: Text(widget.title),
      ),
      body: Center(
        child: Column(
            mainAxisAlignment: MainAxisAlignment.center,
          children: <Widget>[
            const Text(
              'You have pushed the button this many times:',
            ),
            Text(
              '$_counter',
              style: Theme.of(context).textTheme.headline4,
            ),
          ],
        ),
      ),
      floatingActionButton: FloatingActionButton(
        onPressed: _incrementCounter,
        tooltip: 'Increment',
        child: const Icon(Icons.add),
      ), // This trailing comma makes auto-formatting nicer for build methods.
    );
  }
}
We have reached the end of this lesson. Thanks for reading and I hope it was useful.
Comments
Post a Comment